Saturday, March 23, 2013

All Star Nursery/Guestroom

Walker Wallace Ellis
 I am just now posting pics of his nursery. It was a lot of fun to put this room together.  Cara and I were on the same wavelength from day 1.  "All Star" "All American Boy"!!!  Red, White and Blue of course!  We were going for kind of a Ralph Laureny (is that permissible?) look.  Denim and old sports and just boy stuff.  It came together from all my favorite discount  places so we didn't have to break the bank!!!!
We started with the star and ran with it.  I was soooo excited when I found the small iron stars for the window treatments that matched  the large ones on the wall.  Clearance star sheets.  Oh , I forgot to tell you that this room also doubles as the guest room.  I guess you know who the most frequent guest is.  Yep!  You got It!!  Grammy!
Denim duvet and ticking stripe euro shams all came together in a very "add on " kind of way which is the layered look I love.  It is so much more interesting when a room comes together in gathered layers.  There is always room for more.  I actually added a great lamp since these pictures were made.  So I hope you enjoy a peek into our little Walker's world. Enjoy!!!  ele
Love the barbed wire star I found at an antique shop in Arkansas.  This was Callan's crib.

I bought the stripe fabric for the window treatments and pillows at a discount fabric store.
The wall stars were half price at Hobby Lobby.  Flag throw was leftover from Grant's college days ( I washed it!!!)

These prints had been in my gameroom for 10 years, just rematted them.  

Stars and Stripes forever!!!

Ball pillows from Target.  Shag pillow from clearance bin somewhere!?!


Aunt Lacey found the train bookends.

All bedding pieces were pieced together from different discount stores.  I DO love a bargain!

Monkey lovee waiting for Walker.

Iron stars were a great finish on the simple window treataments.

Cara found a great deal on a refinished dresser for storage and a changing table.

Stars on wall that can be added onto.


Friday, January 4, 2013

Finally - Emerald Green is here


God chose emerald green as His neutral!
Finally the 'color gods' at Pantone have chosen EMERALD GREEN as the color of the year! Yippeeeeeee!!  My favorite!  Ok, I still love cobalt blue but I really love EMERALD GREEN. I love them both and really when they are together!!!  Can you believe people get to sit around and pick what colors you are going to buy and love for a living?!  What this means is that you are going to see this color in the stores in everything from apparel to furniture to rugs and accessories.
DO NOT let this  pass you by!  Run, do not walk to get this while it is here. Yes I know that you have been enjoying your pale blues and browns and neutrals. But just think about a splash of emerald to liven things up.
     Now I realize that most of us cannot just change our entire color scheme at every whim. (Oh how I wish I could!)  But there are ways to embrace this color whether or not you care to be dramatic ( I always fall into this category) or subtle. Dramatic would be large masses of color as on wall or floors.  Subtle would be like vases, pillows, and artwork.
      I am putting a visual feast of pictures with emerald for you to enjoy today,  Some of them may spark an idea of how you could embrace this fabulous color.  If not then you can just look around at God's world and enjoy His favorite color.  I always tell my clients that green is the original neutral made by God!  Just look out your window.  All the other colors in nature are shown with green! I really cannot think of any color that does not look good with some shade of green.  When in doubt, GO GREEN!
     Many of these photos come from the good people at House Beautiful.Enjoy!  Hugs to all, ele

Dramatic walls!


Bold walls.

Room sized rug..... dramatic
Just a fun splash!
                                                                   Salt anyone????
Wallpaper.  Yes it IS in style. ( not quite emerald)
This door would be even more fabulous in emerald.


The floor!!  Brilliant!
Serene
This is me on Saturday night......in my dreams.
Paint furniture or reupholster

Gorgeous with periwinkle!

Now tell me you aren't inspired!!!!!!

Verrrrrrry subtle. shhhhhhhhhhhhhhhhhhh


Tuesday, January 1, 2013

A Clean Slate

My chalk board painted ironing board!!
Don't you just love a fresh start?  A clean slate? A do over? A mulligan? A second (or third or fourth)  chance? ( I think you get the picture!)) That is what New Years means to me.  A new start.  No matter how badly I may have failed at some things in 2012 or how fabulously I may have succeeded in some things, they are all in the past. 2013 is what I decide to make it. I am not a big fan of resolutions.  But I am a big fan of making plans and getting started.( Ya well there may not be much difference now that I think about it, oh well)Here are some of the new beginnings I have already started, maybe they will give you an idea or 2.

1. Read through the Bible.  I am using the One Year Bible plan on Bible.com.  I am reading it in the New Living Translation because I need all the simple help in understanding I can get. I love this app because I can read the Bible anywhere and anyplace.  On my phone, on my tablet and on pc.  You download versions that can be read offline so you dont have to depend on an internet connection. 

2. I am using the Loseit.com app to track every bite that goes into my mouth.  It also tracks my exercise.  Yes I have already started the exercise.  I lifted weights for 40 minutes yesterday!!  Yea me!!
Grant, Callan and Walker Dec. 28, 2012
I am motivated by my son who has had a huge influence on our family in the last 2 years in his "clean eating" campaign.  He has a really good blog called veganormous.com.  He is very witty and you will get a good laugh and a lot of humble encouragement. Here is a pic of Grant with his new baby Walker, born Dec. 28 and with 22 month old Callan.  Baby grands are the delights of our lives.

3. I have been on a mission for a few weeks now to bust the clutter once and for all.  If you know me well than you know I am a messy.  I am an organized (know where everything is) messy but none the less a messy.  And all my BFFs are clean freaks!!!  Yes God has a sense of humor. But they love me in spite of my deficiencies and I try to be real careful at their houses. I actually cleaned out bookcases and gave  the Salvation Army 8 boxes of books before Christmas!

Ok those are the three main areas I am starting to gear up.  I have been doing some of them for a while but need to be more consistent. ( I know you can't believe that !?) What can I say, the inconsistency goes with the artsy brain.  We are spontaneous!!!

One other thing!  I will be blogging more this year.  I have lots of ideas, not just in design but in life in general!!!  Be watching!!

I have missed you all!!  Please let me hear from you!  I would love for you to leave your favorite blog in the comments!!!  Let me in on it too!!!  And yes I am already a Pioneer Woman fan but am pretty miffed with her right now as I did NOT win a pair of those awesome boots in December!!!  bummer.

Oh, I just had a thought, a "Clean Slate" is what Jesus is offering every one of us through Jesus. 'Believe on the Lord Jesus Christ and you will be saved!'  Your sins will be wiped away as if they had never been. We all need commitment on a daily basis but I hope that you will consider committing your life to Christ with a clean slate and gain true purpose for 2013.

Hugs, ele


Wednesday, July 25, 2012

Family Reunions - Just the Best

First Cousins in the Cook Clan - not all by any means but a good representation. (why do we look so old???) Cousin Jim grew the produce!
Of all my childhood memories the one about our family reunions are some of the best,  I come from parents with HUGE families.  Dad's family had 9 kids and Mom's family had 11 kids.  We had yearly family reunions on both sides.  It was a blast.  For many years the Hope family reunion was held on Thanksgiving at my Uncle Jim's house in OKC.  They lived on a golf course so there was always a large football game on the course after dinner.  Uncle Jim also owned a hotel so we always got free rooms and all the kids went swimming at the indoor pool.  Cousins are just the best.  Both families believed in having 3 day reunions so we could really get some good visiting and eating (homemade blackberry cobbler at the Cook reunion and Dressing made 3 different ways at the Hope reunion ). Family is truly a gift from God. I really feel bad for people who are only children or do not have any cousins. I know I could call on mine at any time for just about anything.  
Since I moved to Tennessee I have not been able to attend all the reunions but I try to do one side or the other each year.  This year I went to the Cook reunion.  It is amazing how you jump into conversation as if you had only seen them last week instead of 2 or 3 years ago.  That's the beauty of family.

Collins Clan leads the hymn sing.
3 of the 4 Lee Cook kids (missed you Warren) and my husband
Maybe it's because I'm getting older and we are starting to miss some of our loved ones who have gone on before us, but this year seemed sweeter to me.  I especially loved when the cousins from Arizona led us in a hymn sing on the lawn with guitars and 3 part harmony.  Sooo cool. Just doesn't get any better than that. Ok well maybe the chocolate malts in the soda shop or the chocolate cinnamon ice cream nachos that my husband had might be better.  The resort in Northeastern Oklahoma where we have the Cook reunion is "Fin and feather".   It's straight out of an old movie (think of the place in Dirty Dancing) . Rustic and quaint.  Fishing lake in the middle, soda shop with great menu and porch with fans, all you can eat buffet every night, and fun house with games for the kids.  Of course there is the pool too.  The gift shop is stocked to the brim with all kinds of great stuff (we don't find that in Tennessee).  Let's just say this place is  a great memory just waiting to happen.

I your family doesn't have reunions, start one.  Your kids will have the time of their life and you will make memories that will provide smiles for years to come.

Hugs to all, ele


Shades of Amber: How to Use Chalk Paint

Here is a great step by step method of using chalk paint and wax.  There are a couple of details in it that I did not have in my last post.


Shades of Amber: How to Use Chalk Paint: Step One: Paint   Use Annie Sloan Chalk Paint to paint directly onto your piece of furniture, no sanding, priming, or pr...

Saturday, July 21, 2012

Chalk Paint Project


I know you all thought I had dropped off the face of the earth.  Sometimes life just happens.  But thanks to some of my sweet cousins encouragement at our recent family reunion I am at it again.  It seems that creativity runs in spells.  This looks like it is going to be a good spell as I have so many things to share with you!  I promise not to take 6 months  off again.
  I have recently discovered Annie Sloan chalk paint.  Yes I know, I must have been hiding under a rock not to have known about it before now.  However when it did hit my radar it hit over and over and over!  I actually happened on to it in Nashville by happy accident.  Just browsing in a few cute shops when there seemed to be quite a buzz  over a table of paint samples and quarts.  The people in the shop didn't have to sell me the product because the customers did!!!  They were gushing over this product and I had just read a blog about it. I heard them say things like; 'Amazing; no prep work; use on all surfaces; easy and fun; a little expensive but well worth it!; no fumes so  you can do it in the house; water clean up; water thinning; " hmmmmmmmmmmmmm, all sounded good so I dove in head first!  One quart of graphite paint, one can of clear wax and one can of dark wax and one wax brush. I was thinking 'this better be good cause it all totaled about $130!!!  What was I thinking??!!  What can I say??Enthusiasm is contagious!! This had better be good.

     I knew that my sweet daughter-in-law had inherited a couple of really beat up mahogany chests when she got my son. I mean as in tons of college moves and fraternity brutality!!! These chests are not identical but of the same style and they were good solid mahogany.   'Good Bones' if you will. When I heard 'no sanding or prep work' that got my attention.  I have been known to skip critical steps before  ( me impatient???) and this way there were not supposed to be any critical steps to skip!!!  So we dove into this project.


This chest not in quite as bad shape as the other.


Nice lines but terrible shape.

Gouges and scrapes

deep scrapes

      First step is to take off hardware , this is the only prep work we did.
 We just used regular old paint brushes and painted the whole thing 'Graphite'.  We were not careful or worried about how smooth it was.  We were waiting for this paint to do its magic.  It did go on very quickly and dried with in an hour.  Impressive.  Then we put a coat of clear wax.  Think of this as the sealer for the paint. Since it is clear it doesn't make much difference what kind of technique you use.  We used the wax brush to 'paint' ( more like dab) on a layer and then a soft  cloth to smooth out and make sure the entire surface is covered well. We used a little too much at first but then got the hang of it.  After it dries a little while ( 1 hour) then buff it with a soft cloth to get a sheen.  We didn't spend much time on this as we knew we were going to apply the dark wax for the antique finish.  You could stop after clear wax but you would miss the real magic. 
After clear wax step.  Cara with her 3 month 'baby bump'!  Yes, #2 is due in December!!
Dark wax step.
     Next we used fine sandpaper to rub off the edges and high spots.  Think about what would get rubbed off naturally in normal use.  We also sanded through to the wood in a few places on the top and fronts.  The sanding went very quickly. (good thing cause this could have been a deal breaker for me!)  Do not worry about the whitish streaks it leaves in the clear wax because that all goes away when you apply the dark wax.
     The dark was is a little trickier.  You wipe it on with the wax brush and very quickly wipe it down with a lint free cloth to get to the desired amount of antiquing you want.  You much pay attention to the direction you wipe on this step. Always go with the grain.  This wax dries very quickly so work in smaller areas at once.  For instance just one drawer front at a time.  When you get it the way you want it you let it dry and then biff to a soft sheen with a soft cloth.  (We used microfiber from the auto store)  Walah!!!!! Done!!

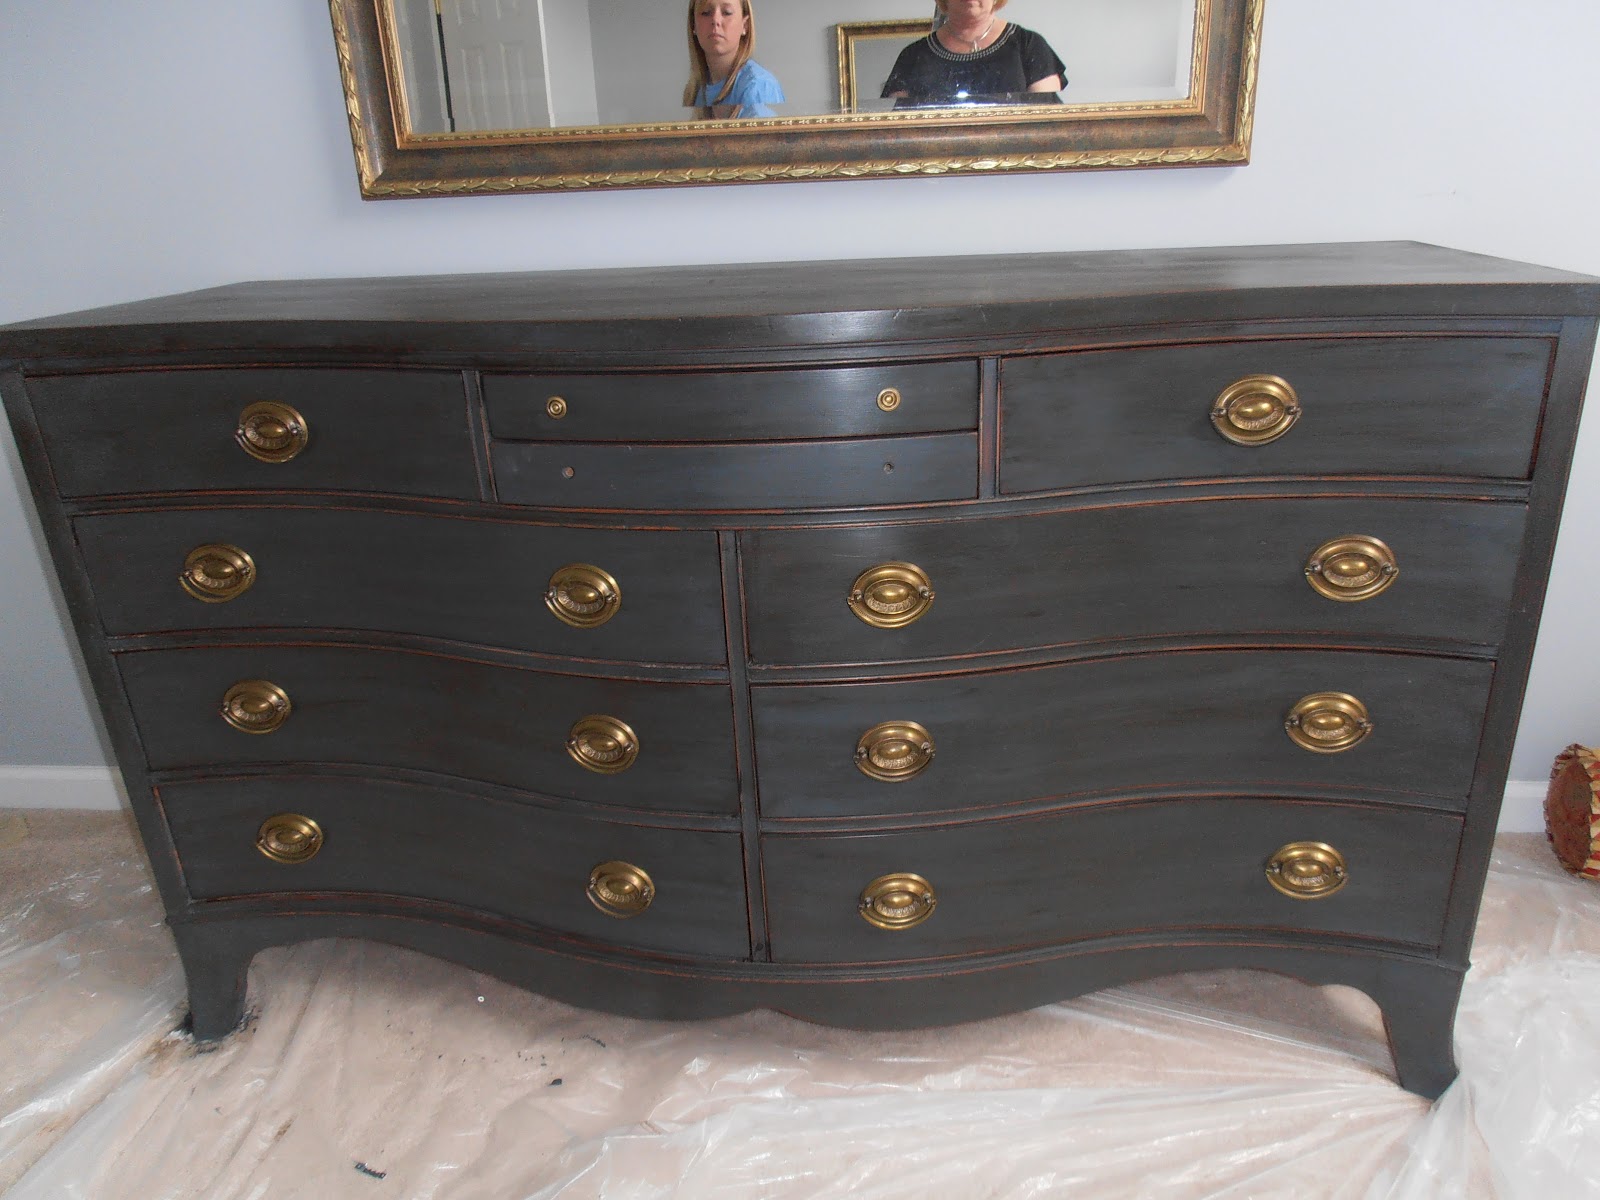
Finished project. ( minus 2 missing knobs!!) We love it!! That's us in the mirror admiring our work. 
The dark wax really adds depth to the project.

These 2 chests are on opposite sides of the room and look very handsome now.  We used about 1/3 can of the paint and probably on about 1/4 each can of wax.  So considering this it turns out to not be too expensive.  The picture below shows the difference in the paint with and with out the dark wax.  The small table is still only paint and clear wax.

 These are both graphite paint but one is plain and the chest is with the dark wax.  I love the way it turned out!!!


 Close up of sanding detail.
Verdict!!!  I love it.  I am still going to compare to another process my friend Lynn in Dallas uses and I will let you know.  Have fun!!!
This paint is franchised and only sold in 1 place in each city as far as I can tell.  Look on their website, anniesloan.com  to see where it is sold.  The story of how Annie Sloan came to invent this type of paint is very interesting. She seems to be the 'queen of faux finishes'.  


Sunday, December 18, 2011

Mrs. Walter's Cinnamon Roll Recipe

Isn't it amazing how wonderful aromas can bring back such vivid memories from our childhood? One of those wonderful memories for me was from a tiny frame house where a
Fresh hot cinnamon rolls!  uh oh - minus 1!?( I love the center ones!)
baking in the oven (can't your smell them?)
sweet little lady, Mrs. Walters, baked for people in our little town. You could smell the bread baking from blocks away.  Her cinnamon rolls were a staple at our house anytime we were having guests.  Large and ooey gooey with lots of winds.  Every bite was to savor.  The browned butter icing filling every crevice  was a sensory delight.  She was kind enough to give us the recipe when I was a teenager.  Silly me for ever thinking I could duplicate.  I actually have a picture of my sister and I chiseling the icing out of the pan after a dismal failure.  Well it has taken me 40 years to get up the courage to try again and amazingly it was a success!!!  Not sure I can do it again but for this one time they were perfect.  It was such a large batch that I gave them out to several people and now they are asking for the recipe.  I am glad to share it with you and hope that you too can create memorable smells for your families to enjoy this holiday season.  I cannot guarantee your success any more than I can my own but I'm sure you will create warm memories just trying.  Enjoy!!!   ele

Recipe: ( this is half her recipe which will make about 2 dozen, can be doubled if you want)
1 package dry yeast
2 cups water
1/2 cup sugar
6 cups flour
1 1/2 teaspoons salt
5 Tablespoons melted shortening
1 egg

Measure warm water , add sugar  yeast and salt.  Add half the flour to this mixture and mix well. Add the shortening and 1 beaten egg. (you can add a few drops of yellow food coloring at this point if you would like) Add remaining flour and mix in bowl til smooth.  Allow this to rise til double in bulk ( about 2 hours)punch in down and roll out on a floured surface to about 1/3 inch thick into a large rectangle. Brush entire surface with melted butter and liberal sprinkling of cinnamon and sugar. Roll up from one end and cut into 1/2 to 1" pieces and place in a greased pan. Let these rise again till about double in bulk.  ( some rising will occur during baking)Bake at 375 degrees for about 20 minutes. If not browned bake a little more.  While baking make icing.

Icing: Brown 1/2 cup sugar in skillet and then add 1 stick of butter and 1/4 cup milk.  don't be alarmed if it clumps at this point, keep stirring.  Add powdered sugar while stirring till you get it the consistency you want, should take about 1 lb.   Pour this over hot rolls to completely cover.  These freeze well but always serve warm to get the full pleasure. !

This is how the icing looks.

Thursday, December 15, 2011

Bright spot in th midst of dreary sickness.

An inexpensive decorating idea.


The runners!
Precious sick baby Callan.
Sick, sick and more sick is what has eaten up the last month and put me so far behind this holiday season.  First I had the flu (Hump #1) and before I got well I was called to help with my sick grandbaby in Nashville who has caused her parents to miss a lot of work.  So we gladly went  over later  that week as I got stronger,  helped them out a couple of days and headed back to Memphis.  Hump #2 done. Then grandbaby came to Memphis a week later so her parents could run in the St. Jude 1/2 marathon and she woke up with the stomach virus  again.  Parents in a panic as she obviously could not go back to daycare the next day so I got in the car with them and went home to Nashville and stayed the next 4 days with a very sick baby.  Hump #3 went on endlessly for the little one. Meanwhile my hubby went down with the stomach virus (Hump # 4) and had to go it alone as his wife was off in Nashville.  Then my son began with the stomach virus  (Hump # 5)as soon as we got to Nashville. This virus is NOT a quick one and leaves your stomach problematic for several days.  Then just as baby was getting better her mother came down with a terrible throat and cough (Hump #6).  Then son caught the throat cold but got better quickly with juicing and veges. (ck out his new vegan blog  www.veganormous.com) Now I find out that the baby is back to diarrhea again!!!! (Hump #7 ongoing)  Running tests tomorrow.  Please pray.
 I say all this to tell you why I have not blogged in almost a month!  But I've been thinkin about ya!  So here are a couple of Christmas ideas I worked on during the sick duty.   These plastic  plates came from Hobby Lobby  at  1/2 price.  Just glued them together and put stick on letters for the JOY. Cute on a stand for about $7 total. The small plate came as you see it.  Got this cute idea from my sweet ( and sick) daughter in law. She also showed me hoe to make these tissue Christmas trees!  Just cut 2"x4" squares of tissue and bunch them up and pin them to foam tree forms. (also from Hobby Lobby)  Very easy to do and them set them on painted candlesticks to elevate them for a fun and inexpensive Christmas decoration. You all wash your hands and take your vitamins!!!  This sick season has way too much to offer!!!  hugs to all, ele